In the past, I have used Windows Preview Handlers as a convenient means of previewing documents inside my Windows Forms applications. The main advantage of this was not having to write my own previewing logic for a (potentially limitless) range of file formats, and using a standard OS feature that has been widely supported since Windows Vista.

Unfortunately, one of the great benefits of preview handlers has also caused a lot of headaches for me; not all implementations are created equally. Some handlers are well-written and play nice with .NET hosts, others have major bugs and memory leaks, and some simply do not work at all. And one of the worst culprits is Adobe’s PDF Preview Handler, installed along with Adobe Reader and Acrobat.

I’ve now come to the conclusion that, at least for PDFs, Preview Handlers are no longer a viable solution and a more reliable alternative is needed. The problem is that generating a preview for a PDF document is no trivial exercise – to do so requires a parser, a PostScript interpreter, libraries for  typography, image processing, compression, cryptography and more. While I have been experimenting with all of these, I needed something that was suitable for immediate production use.

Enter, PDF.js…

PDF.js is a JavaScript library, developed by Mozilla Labs, that can be used to view PDFs in a web browser. It is the basis for the built-in PDF viewer in Firefox, but also works in other browsers. Unlike other mechanisms, it requires no operating system or third party PDF applications to be installed, being completely self-contained. It’s also small (around 4MB) and performs quite well.

If I was developing a web application, I would most certainly leverage PDF.js to preview documents – it’s the obvious choice, really. However, working mostly in the desktop world, I needed a way of utilising this excellent library in the Windows Forms environment.

The WebBrowser problem

The built-in WebBrowser control is a handy way of leveraging HTML/JavaScript content inside a desktop application. As well as being able to display content alongside other controls on a form, there is also some limited interactivity possible between the DOM and the hosting application. So on face value it might seem like a good way to leverage PDF.js…

Problems:

  1. For compatibility reasons, the browser runs in Internet Explorer 7 emulation mode, which lacks proper, standards-compliant HTML, CSS and JavaScript support.
  2. The PDF.js viewer does not work properly unless loaded over HTTP – a file URL is not sufficient.
  3. PDF.js (in the majority of cases) can only render documents loaded from the same origin (domain) as itself.

Solving these problems with a local HTTP server

The first problem has been largely solved by PDF.js already; it is possible to override the compatibility settings for the web browser control by including the X-UA-Compatible meta tag in the <head> section of the HTML page. This elevates the browser to Internet Explorer 11 mode. A version of PDF.js built for ECMAScript version 5 browsers (including IE11) is available, making it possible to use the viewer in that browser.

The other two problems require a more drastic solution; since the script expects to be loaded over HTTP, we need to serve it using a local HTTP server. Ideally this should be something lightweight that does not require additional setup or elevated privileges to run. Due to the same-origin requirement, we also need a way of ensuring that the document loaded into the viewer can be accessed via the same server.

To meet these requirements, I chose NHttp – a simple embedded HTTP server with no other dependencies. Unlike the .NET Framework’s built-in HTTP server based on http.sys in Windows, NHttp does not require URL reservations and therefore does not require admin privileges to run. It also spins up quickly, making it very desirable for our needs.

The server simply acts as a proxy between the PDF.js scripts, the document to be previewed and the web browser. It places them behind an HTTP URL and ensures that they are accessed from the same origin (even if their true locations differ). Together, this solves all of the problems above.

How it works

From start to finish, the process of previewing a PDF inside a WebBrowser control is as follows:

  1. The PDF.js files are extracted to a temporary directory when the component is initialised. By storing these inside the assembly as an embedded resource, the project has an even lighter footprint.
  2. The HTTP server starts listening on the local IP address, using a random port number so as not to interfere with any other services that might need port 80.
  3. The application registers a local filename (which could be on another drive or network share) with the server, in exchange for a unique URL that will be used to display the preview. (In theory, this could also be an in-memory stream or even a document located at another URL) This URL points to the PDF.js viewer, preloaded with the correct document.
  4. The application navigates the WebBrowser control to the URL obtained in the previous step.
  5. The server receives multiple requests. Depending on the path:
    1. If the path starts with “/doc”, then the local filename registered in step 3 is served to the browser.
    2. If the path corresponds to one of the PDF.js source files, that file is served to the browser.
  6. The WebBrowser loads the viewer, and PDF.js loads and displays the document to the user.
  7. When the application no longer needs to display the preview, the HTTP server can be stopped. At this point, the temporary directory can be cleaned up as well.

Example:

// register the local file with the HTTP server
string url = host.GetUrlForDocument(openFileDialog.FileName);

// open in embedded web browser
webBrowser.Navigate(url);

Implementation notes

The Host class (which implements the HTTP server and the registration method) implements the IDisposable pattern. It is important that caller properly disposes the component or else the application may not exit.

For performance and responsiveness reasons, the PDF.js files are extracted asynchronously after the host is initialised. This assumes that some time will elapse before the first document preview is loaded (otherwise, the main thread will block until the process has completed).

The HTTP server supports GET, HEAD and OPTIONS methods (even though the browser seems not to take advantage of the latter two). It also supports the If-Modified-Since request header and allows the browser to cache the content. This could improve loading times for subsequent previews.

Once a local filename is registered with the host, its URL remains valid for 30 minutes after it was last accessed.

Source code

The project is available on GitHub, along with a demo application: https://github.com/BradSmith1985/PdfJsDesktopHost

In .NET, it is commonplace to use byte arrays when working with binary data; for example, passing the contents of a file between methods, encoding/decoding text, reading data from sockets, etc. These arrays can get quite large (up to megabytes in size), which can eventually lead to OutOfMemoryException being thrown if the runtime is unable to allocate a large enough block of memory to hold the array. Since arrays are always allocated as a single, contiguous block, this exception can be thrown even when there is more than ample memory available. This is due to fragmentation, where used blocks of memory occupy a sparse range of addresses, and available memory exists only as small gaps between these blocks.

Memory fragmentation

One way to avoid this problem is to only operate on a small number of bytes at a time, using a buffer. This approach is often used in conjunction with streams. For example, we can avoid loading an entire file into memory by using a FileStream and reading its contents into a small array, say 4KB at a time. This can be a very efficient way to use memory, provided that the data comes from an external source and can be exposed via a Stream object.

When this is not the case, the MemoryStream class often comes into play. This type allows us to read and write data, still in small sections at a time if desired, without using I/O. You might use a memory stream to perform on-the-fly conversion of data, for example, or to make a seekable copy of a stream that doesn’t normally support this. However, there is a significant limitation in that the backing store for a memory stream is just a large byte array! As such, it suffers from the same issues in terms of contiguous allocation and vulnerability to memory fragmentation.

So, whether it’s large byte arrays of memory streams, either way you can run into OutOfMemoryException if you use these mechanisms frequently or in large volumes.

Arrays vs Linked Lists

When we look at various collection types and their implementations, there is a stark difference between arrays and linked lists. While arrays require a contiguous block of memory, linked lists are able to span multiple non-contiguous addresses. So, at first glance, a linked list of bytes might seem to be a reasonable solution to our problem.

Array vs Linked List

The problem with using a straight linked list of bytes is that each byte requires 4 additional bytes (or 8 on 64-bit machines) to store the address of the next element, making it extremely inefficient in terms of storage. Also, arrays are of fixed length while linked lists tend to grow and shrink as needed; since each new element requires memory to be allocated, writing to a linked list is much slower.

Furthermore, linked lists cannot benefit from the Buffer.BlockCopy() method, which offers vastly improved performance when copying between byte arrays.

A Hybrid Solution

An ideal solution would give us the best of both worlds; i.e. the non-contiguous nature of linked lists with the performance benefits of arrays. In other words, a linked list of smaller arrays. Since our goal is to ultimately replace both large byte arrays and the MemoryStream class, the solution needs to be both writable and of variable length.

Linked List of Arrays

In order to utilise available memory in the most efficient way, each of these smaller arrays should be equal to (or a multiple of) the size of each block of memory allocated by the operating system. In the case of Windows (at least at the time of writing), virtual memory is allocated in blocks of 4KB. This is known as the page size. By aligning the arrays to the page size, we avoid wasting any of the memory we allocate (and thus depriving other parts of our code of it).

If we are going to want to write to this structure, it is better to allocate the entire 4KB once to each array than to have to re-declare and copy over the existing data each time its length changes. The effect of this decision is that we require an additional field on each node that stores the number of bytes actually used. This would also mean that even a 1-element collection would still occupy 4KB of memory. We can avoid this by making an exception for the first array.

Indexing

To access the byte at a particular offset in the collection, we need to traverse the linked list until we reach the node containing the offset, then get/set that element in that node’s array.

Reading

Reading an arbitrary number of bytes from this collection involves two steps:

  1. Traverse the linked list until we reach the node containing the offset from which we want to start reading.
  2. Copy bytes from the array to the destination. If there are still more bytes to copy after the number of used bytes is reached, traverse to the next node and repeat this step.

Writing

Writing an arbitrary number of bytes to this collection consists of these steps:

  1. Traverse the linked list until we reach the node containing the offset at which we want to start writing.
  2. If there are more nodes after the current node, copy up to the number of used bytes only; otherwise, copy up to the full length of the array and update the number of used bytes. (This avoids inserting data when our intention is to replace or append it)
  3. If there are more bytes to write, traverse to the next node. If it does not exist, create it. Repeat from step 2.

Inserting

Although this is not normally possible with streams or byte arrays, the ability to insert an arbitrary number of bytes at some point in the collection would be quite desirable. For example, say you received a series of packets over a UDP connection and wanted to reconstruct the message in the correct order, you could simply insert the bytes from each packet at the desired offset. Without this functionality, several arrays would be required and you would likely have to duplicate the data in memory.

Inserting involves these steps:

  1. Traverse the linked list until we reach the node containing the offset at which we want to insert the data.
  2. Truncate the array (that is, update the number of used bytes) at this offset and copy the remaining bytes into a temporary array. (If the array is completely unused, skip this step)
  3. Copy bytes until the array is full. If more arrays are needed, insert them after the current node and repeat.
  4. Copy the remaining bytes from step 2 into the current array (inserting another node if required).

Following an insert operation, there may be ‘gaps’ in the collection where the number of used bytes is less than the length of each array. Removing these gaps would be an expensive operation.

Deleting

As a complimentary operation to insertion, it should be possible to remove an arbitrary number of bytes from the collection, starting at any offset. The process involves:

  1. Traverse the linked list until we reach the node containing the starting offset from which we want to delete data. Capture this node.
  2. Keep traversing the linked list until we reach the node containing the end offset (start + count). Capture this node.
  3. Copy the trailing bytes after the end offset (in the end node) into a temporary array. (If there are no trailing bytes in the array, skip this step)
  4. Truncate the array (that is, update the number of used bytes) in the start node after the starting offset.
  5. Insert the trailing bytes from step 3 after the starting offset.
  6. Remove all intermediate nodes from the linked list (by updating the ‘next’ and ‘previous’ markers), including the end node.

As with insertion, deletion may create ‘gaps’ in the collection.

Serialisation

It is sometimes necessary to serialise a byte sequence; for example, in order to embed the data within an XML document, or to marshal it between application domains. Since this functionality is supported for byte arrays and memory streams, our collection should also implement it.

Accepting the default binary serialisation would result in a sub-optimal result, so we will provide custom logic by implementing ISerializable. The same goes for the XML serialiser (in fact it likely wouldn’t work at all), so we will also implement IXmlSerializable. For the former, the serialized form is a sequence of byte arrays mirroring those in our collection, followed by the total number of arrays. For the latter, only the arrays need to be written (using Base64 encoding).

Stream Implementation

Up to this point, we have implemented a collection of bytes that can be used in much the same way as a conventional byte array; indexing, reading, writing and so on. Now, we want to implement a stream class that uses our collection as a backing store, and can be used instead of MemoryStream. Together, these two types should allow us to avoid having to allocate contiguous blocks of memory, thus avoiding OutOfMemoryException (except when the process genuinely runs out of memory, of course, which we can do nothing about).

Streams provide 3 basic operations; reading, writing and seeking. To read data into a buffer, we can simply read from the underlying collection using the functionality we already implemented, starting from the stream’s position marker. The same applies to writing. After each operation, we need to increment the position marker by the number of bytes actually read/written. Finally, seeking is achieved by directly manipulating the position marker.

An advanced use case for streams is being able to change the length of the stream. This can be achieved by either truncating the collection (see Deletion above) or by adding the required number of bytes to the end of the collection.

Results

To see whether the benefits offered by our new collection are actually being delivered, I ran a simple test that could be applied equally to it or to conventional byte arrays: A large number of bytes (in this case, 10MB worth) are allocated and the result is held in a list (to prevent the garbage collector from reclaiming the memory). This process repeats indefinitely until an OutOfMemoryException is thrown, at which point the number of iterations is measured. I observed that the non-contiguous method consistently survived for 50% more iterations than using byte arrays.

It’s not all good news, however. As you would expect, there is a performance penalty for a more efficient use of memory, and the non-contiguous method takes considerably longer to complete (several orders of magnitude, in fact). This is because the non-contiguous allocation of memory is an O(n) operation compared to O(1) for arrays. This means that it takes 2560 times longer to allocate 10MB non-contiguously than it does as an array. You can improve this by choosing a larger block size (e.g. a 32KB block size resulted in a significantly faster run without significantly fewer iterations) but if the size is too great, it defeats the purpose of allocating the memory non-contiguously in the first place. This also relies on the caller knowing the total length of the data, which cannot be guaranteed.

Ultimately, this collection and stream type are designed to solve a very specific problem, and I would recommend using this approach if memory fragmentation is an issue that affects your code too. I would stop short of recommending it for general use, or as a replacement for byte arrays and MemoryStream entirely.

Download

The source code for this project is available on GitHub: https://github.com/BradSmith1985/NonContig

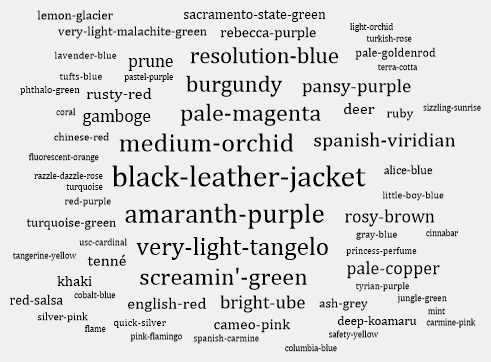
A typical tag cloud

Tag clouds are a mechanism for showing a list of topics/categories along with their relative frequencies of occurrence. This can useful for finding content on blogs, news sites, discussion boards, information systems and more. They can be textual or graphical, although the latter gives much greater flexibility and is the focus of this article.

Much thought can be given to the layout of a tag cloud. You will notice that the default WordPress tag cloud used on this blog simply lists the tags in alphabetical order and uses progressively larger font sizes to denote the more frequently-used ones. More sophisticated layouts try to position the most frequently-used tags in the center, with the least-used being furthest away. I have even explored force-directed algorithms for this purpose, although I later concluded that they were not well-suited to the problem.

The solution I ultimately adopted takes an iterative approach and uses fitness criteria to arrive at an optimal layout. It places each tag on the diagram in order from highest to lowest frequency. The position of a tag is determined only by the tags which preceded it. Starting at the center and working outwards, a position is chosen such that the tag does not collide with any previously-placed tag. Several criteria are used to compute the fitness of the solution if the tag were to remain at that position. This process is repeated for all directions (360 degrees). Each time a more optimal solution is found, the tag is moved to that position. When all angles have been exhausted, the tag will be at its most optimal position and control moves to the next tag.

The fitness criteria are as follows:

  • The smaller the total area of the tag cloud, the better
  • The more square* (i.e. least difference between width and height) of the tag cloud, the better
  • The less distance from the center of the tag cloud, the better

* Or some other aspect ratio

The Algorithm

  1. Sort the collection of tags by frequency in descending order.
  2. Let totalBounds represent the used bounds of the tag cloud, and be initialised at zero.
  3. For each tag in the collection:
    1. Let bestBounds represent the bounds of the most optimal solution so far, and be initialised at zero.
    2. Let bestDist represent the distance from the center of the tag cloud for the most optimal solution, and be initialised at zero.
    3. For each angle from 0 to 360 degrees:
      1. Let tagBounds represent the bounds (position and size) of tag, and be initialised at the center of the tag cloud.
      2. Let tagDist represent the distance from the center of the tag cloud, and be initialised at zero.
      3. Repeat the following:
        1. Move tagBounds to a point tagDist units from the center of the tag cloud at angle.
        2. Check whether tagBounds collides (intersects) with the bounds of any tags previously placed.
        3. If there are collisions, increment tagDist. Otherwise, exit the loop.
      4. Let isBest represent whether all of the following are true:
        • The area of (totalBounds ∪ tagBounds) is less than the area of bestBounds (or bestBounds is empty)
        • The difference between the width and height of (totalBounds ∪ tagBounds) is less than the difference between the width and height of bestBounds (or bestBounds is empty)
        • tagDist is less than bestDist (or bestDist is zero)
      5. If isBest is true:
        1. Set bestBounds to (totalBounds ∪ tagBounds).
        2. Set bestDist to tagDist.
        3. Move tag to the location of bestBounds.
    4. Set totalBounds to bestBounds.

Implementation

My implementation of the algorithm above takes the form of a C# class named TagCloud, which represents a tag cloud and offers methods to apply the layout and render to a screen or bitmap.

Included is the ability to specify basic visual properties such as the font face, colour and style, as well as the gradient between the font size of the tags with the highest and lowest frequencies. I also provided a way to favour a particular aspect ratio (as not everyone wants a perfectly square tag cloud), although it should be noted that the aspect ratio of the final tag cloud will fall somewhere between the desired value and 1:1 (square).

Tags are represented by the TagItem class, which encapsulates the name and frequency. They are added to an order-unimportant collection, to be sorted during the layout process.

After calling the Arrange() method, the tag cloud can be rendered to a GDI+ Graphics object representing the screen, a bitmap or a printer. The Draw() method accepts a target rectangle within which the tag cloud will be automatically scaled and centered.

To facilitate interactivity, a HitTest() method is also provided to determine the tag at the specified coordinates.

Observations

  • Tags with the highest frequency occupy the center of the cloud as intended, and tend to stack vertically at first (as this fits the criteria for “squareness”).
  • Subsequent tags occupy the surrounding space and progressively move outward from the center as intended.
  • Shorter and lower-frequency tags sometimes fill in gaps between larger tags. This happens more as the difference in font size between the tags becomes more extreme.
  • Performance begins to degrade beyond about 128 tags. This seems acceptable when you consider how readability decreases as the number of tags increases.
  • The distribution of the tag frequencies affects the performance of the layout algorithm. When randomly generated using a normal distribution, it runs slower than a more typical distribution (where a few tags dominate and there are many tags with a very low frequency).

Performance

Although the algorithm contains 3 nested loops, the number of angles in the second level remains constant and thus the performance is O(n²). This can be demonstrated by progressively increasing the number of tags and measuring the number of cycles of the innermost loop:

Further Optimisations

  • By trying angles in a random (shuffled) order, the tags better fill the available space
  • Rather than trying all 360 directions, similar results can be achieved by choosing the first 90 from the shuffled set
  • Rather than increasing by 1 each time, distances can increase in increments comparable to the size of each tag
  • If the current most optimal distance has been exceeded, we can stop incrementing the distance and try another angle
  • If placing a tag does not cause the total bounds of the tag cloud to increase at all, we can skip over the remaining angles and place the next tag

Example Usage

TagCloud cloud = new TagCloud();

// add some tags
cloud.Items.Add(new TagItem("orange", 2));
cloud.Items.Add(new TagItem("red", 4));
cloud.Items.Add(new TagItem("green", 12));
cloud.Items.Add(new TagItem("pink", 96));
cloud.Items.Add(new TagItem("black", 1));
cloud.Items.Add(new TagItem("brown", 50));
cloud.Items.Add(new TagItem("yellow", 45));
cloud.Items.Add(new TagItem("purple", 32));
cloud.Items.Add(new TagItem("gold", 8));
cloud.Items.Add(new TagItem("silver", 7));

// apply layout
cloud.Arrange();

using (Bitmap bmp = new Bitmap(512, 512)) {
   // render to bitmap
   cloud.DrawToBitmap(bmp);

   // save bitmap
   bmp.Save("test.png", ImageFormat.Png);
}

Download

The source and binaries for this project are available on GitHub.

Final Thoughts

This implementation produces good results with reasonably good performance. I see potential for further optimisation (being able to achieve O(n log n) performance would be highly desirable!) and additional features, such as being able to vary text colour and other visual properties on a per-tag basis.

Animation

Drop-down controls are most commonly employed when the user is required to make a single choice from a discrete list of items. It does not matter whether the items are static or dynamic, however good UI design dictates that the list of choices should not be too long. Requiring users to scroll through large drop-down lists is slow and inefficient, so a search facility is often provided in this scenario. However, search functionality can add complexity to the UI and disrupt its flow (especially if the search opens in a separate window).

A good compromise is an inline search, contained entirely within the drop-down control. The Windows Forms ComboBox control achieves this to some extent through AutoComplete, however it has some drawbacks:

  • It is designed to allow arbitrary text input (i.e. DropDown style vs DropDownList style)
  • Matches against the start of strings only
  • If using a custom source, all strings must be loaded into memory first

In order to develop a better solution for long lists of choices where a discrete selection must be made, I decided to extend my earlier ComboTreeBox control to support searching.

Enhancements to ComboTreeBox and DropDownControlBase

In order to support the search functionality and differences in control behaviour, some enhancements to the base classes were required. These included:

  • Being able to paint the control in the style of an editable combo box
  • Controlling whether the ToolStripDropDown handles keyboard events
  • Implementing ICloneable on ComboTreeNode to allow nodes to be duplicated
  • Excluding certain nodes from selection by the user

These changes were, by and large, trivial. All were implemented with the aim of leaving the default behaviour of the ComboTreeBox control unchanged.

One important note, however: When the control is painted in the style of an editable combo box, the drop-down glyph is reproduced manually and is therefore dependant on the operating system version. In order to accurately detect Windows 10, the application must include a manifest file with the appropriate supportedOS element, e.g:

<assembly manifestVersion="1.0" xmlns="urn:schemas-microsoft-com:asm.v1">
   <compatibility xmlns="urn:schemas-microsoft-com:compatibility.v1">
      <application>
         <!-- Windows 10 -->
         <supportedOS Id="{8e0f7a12-bfb3-4fe8-b9a5-48fd50a15a9a}" />
      </application>
   </compatibility>
</assembly>

Implementing text input

Since the DropDownControlBase class directly derives from the Windows Forms Control class (not TextBoxBase or ListControl), it does not have access to any built-in support for text input. Since we only intend to capture a short search term entered by the user, our requirements for text input are very basic.

I created a reusable TextServices class to allow this basic functionality to be added to any control, regardless of its base class. It handles mouse and keyboard events in a pass-through fashion, manipulating an internal StringBuilder instance that represents the single line of text in the control. It is initialised with a reference to the control upon which it operates and a callback method which provides the bounds of the text box (in the case of our control, this is the bounds of the control excluding the drop-down button).

It supports:

  • Character input
  • Control keys (caret movement, selection, clipboard commands)
  • Mouse events (caret position, selection, context menu)
  • Clipboard commands (cut, copy, paste)
  • Painting the text and highlight within the text box bounds

Text input can be toggled using the Begin() and End() methods.

Creation and manipulation of the caret is performed using P/Invoke. The relevant Win32 functions (all from User32.dll) are:

  • bool CreateCaret(IntPtr hWnd, IntPtr hBitmap, int nWidth, int nHeight)
  • bool DestroyCaret()
  • bool HideCaret(IntPtr hWnd)
  • bool SetCaretPos(int x, int y)
  • bool ShowCaret(IntPtr hWnd)

DropDownSearchBox

The basic operation of the searchable drop-down control is as follows:

  1. The control initially contains some nodes. This may only be a subset of the total number of choices (e.g. the most recently/frequently used).
  2. Opening the drop-down, clicking within the bounds of the text box or typing into the control while it has input focus will replace the caption on the control with a blinking caret, and start accepting text input.
  3. If no text has been entered, the initial drop-down items will continue to be displayed.
  4. If the length of the string is between 1 and (MinSearchTermLength - 1) characters, the drop-down will display a message inviting the user to complete their search term.
  5. Once the minimum length has been satisfied – and for each subsequent change to the string – the control will invoke the PerformSearch event in a separate thread. If a search is already in progress, it will first be cancelled through the CancellationToken.
  6. If the search runs to completion, nodes representing the results are added to drop-down. The drop-down now contains only the items that matched the search term.
  7. Selecting one of the search result nodes will invoke the CommitSearch event. If the node was part of the initial collection (or if it is equivalent to one such node) then the existing node will become the selected node. Otherwise, a copy of the node will be added to the collection. (Alternatively, the user can cancel out of the search by clearing the text, closing the drop-down or causing the control to lose input focus.)
  8. The control will now behave as normal, until the user re-enters “search mode”.

Since the drop-down displays different sets of nodes depending on the state of the control, the searchable drop-down control adds NormalNodes and AllNormalNodes properties to keep track of the nodes which are initially displayed (mirroring Nodes and AllNodes on the base class).

If the PerformSearch event is not handled or overridden, the default logic is to perform a linear search on the initial nodes in the drop-down, using case-insensitive matching on the nodes’ Text property. Normally, however, you would handle this event and substitute your own search logic (e.g. querying an SQL database, calling a web service, reading from a stream, etc).

protected virtual void OnPerformSearch(PerformSearchEventArgs e) {
   if (PerformSearch != null) PerformSearch(this, e);

   if (!e.Handled) {
      // default search logic
      foreach (ComboTreeNode node in AllNormalNodes) {
         e.CancellationToken.ThrowIfCancellationRequested();

         if (DefaultSearchPredicate(node, e.SearchTerm)) {
            e.Results.Add(node.Clone());
         }
      }
   }
}

protected virtual bool DefaultSearchPredicate(ComboTreeNode node, string searchTerm) {
   return node.Selectable 
      && (node.Text.IndexOf(searchTerm, StringComparison.OrdinalIgnoreCase) >= 0);
}

It is not necessary to handle or override the CommitSearch event unless you need to differentiate between nodes with identical values for the Name or Text properties, although it may be more elegant to test for equality using a unique key of some sort.

protected virtual void OnCommitSearch(CommitSearchEventArgs e) {
   if (CommitSearch != null) CommitSearch(this, e);

   if (!e.Handled) {
      ComboTreeNode match = null;

      // try to find an equivalent match in the normal list
      if (e.Result != null) {
         if (OwnsNode(e.Result)) {
            match = e.Result;
         }
         else if ((match = AllNormalNodes.FirstOrDefault(
            x => DefaultEquivalencePredicate(e.Result, x))) == null) {
            // search result not in original collection; add
            match = e.Result.Clone();
            Nodes.Add(match);
         }
      }

      SelectedNode = match;
   }
}

protected virtual bool DefaultEquivalencePredicate(ComboTreeNode result, ComboTreeNode test) {
   if (!String.IsNullOrEmpty(result.Name)) {
      if (String.Equals(result.Name, test.Name, StringComparison.OrdinalIgnoreCase)) return true;
   }

   if (!String.IsNullOrEmpty(result.Text)) {
      if (String.Equals(result.Text, test.Text, StringComparison.OrdinalIgnoreCase)) return true;
   }

   return false;
}

Being derived from ComboTreeBox, the searchable drop-down control supports both flat and hierarchical data, however for simplicity’s sake it is recommended that search results do not contain nested nodes. You can exclude nodes from the search by setting their Selectable property to false; likewise, you can include informational nodes in the search results that cannot be selected.

Example usage

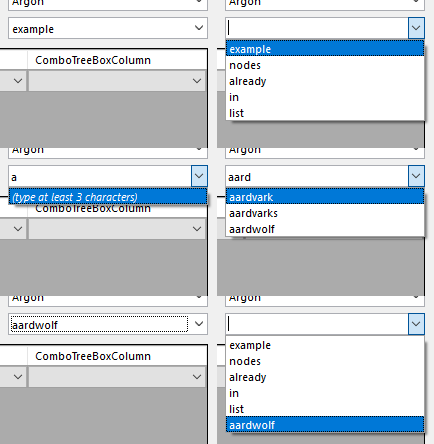
You can use the built-in search functionality of the DropDownSearchBox control simply by adding it to a form and populating it with nodes (as you would a ComboTreeBox). Try typing into the editable part of the control; the nodes will be filtered according to the search term you enter.

Below is a less trivial example where the search runs against an external data source. The following example assumes the existence of a DropDownSearchBox (dsbExternal) and an ADO.NET DataTable (_table) containing a list of dictionary words:

protected override void OnShown(EventArgs e) {
   dsbExternal.BeginUpdate();
   dsbExternal.Nodes.Add("example");
   dsbExternal.Nodes.Add("nodes");
   dsbExternal.Nodes.Add("already");
   dsbExternal.Nodes.Add("in");
   dsbExternal.Nodes.Add("list");
   dsbExternal.EndUpdate();
   dsbExternal.PerformSearch += dsbExternal_PerformSearch;
}

void dsbExternal_PerformSearch(object sender, PerformSearchEventArgs e) {
   // filter the DataTable using the LIKE operator
   string adoFilter = String.Format("Word LIKE '{0}%'", e.SearchTerm.Replace("'", "''"));

   // create a node for each matching DataRow
   foreach (DataRow dr in _table.Select(adoFilter)) {
      e.CancellationToken.ThrowIfCancellationRequested();
      e.Results.Add(new ComboTreeNode(dr.Field(0)));
   }
}

Download

Visit my Drop-Down Controls project page to download the source and binaries for the DropDownSearchBox control.

single-instance-custom-uri-scheme

Preventing multiple instances of an application from running at the same time is a common requirement, especially for business software. By limiting to a single instance of an application per machine, the task of managing network connections, local and remote resources, client sessions and licensing requirements is greatly simplified. An additional advantage is that it allows the application to service requests from other programs. There are many ways of doing this – named pipes, window messages, sockets, temporary files, etc – however this article will focus on one particular method, namely a custom URI scheme.

URI schemes allow programs to issue commands to your application (usually for navigation or performing simple actions), encoded as a URI/URL. By allowing the operating system to handle the URI, neither application has to be aware of the other, nor include any special provisions to communicate with each other. In C#, this is done very easily via the Process.Start() method.

The following components are required in order to implement this functionality:

  • A service class (which is exposed by the application instance via .NET remoting)
  • A modified entry point (which will either communicate with the service and then terminate, or start the application normally)
  • An installer (to register the URI scheme, which requires elevated privileges)

Service class

The service class acts as both a client and server, depending on how the application was started. It performs the following operations:

  • Registers the service as a well-known type and opens an IpcServerChannel so that it can be consumed by other instances of the application.
  • Connects to the service (called from another instance of the application) using an IpcClientChannel and returns a remote reference, or null if there is only one instance of the application.
  • Handles the URI by performing the command/action encoded within it.

In order to allow cross-AppDomain (and therefore cross-process) calls, the service class needs to inherit from MarshalByRefObject.

public class UriHandler : MarshalByRefObject, IUriHandler {

    const string IPC_CHANNEL_NAME = "SingleInstanceWithUriScheme";

    public static bool Register() {
        try {
            IpcServerChannel channel = new IpcServerChannel(IPC_CHANNEL_NAME);
            ChannelServices.RegisterChannel(channel, true);
            RemotingConfiguration.RegisterWellKnownServiceType(
                typeof(UriHandler), "UriHandler", WellKnownObjectMode.SingleCall
            );

            return true;
        }
        catch {
            Console.WriteLine("Couldn't register IPC channel.");
            Console.WriteLine();
        }

        return false;
    }

    public static IUriHandler GetHandler() {
        try {
            IpcClientChannel channel = new IpcClientChannel();
            ChannelServices.RegisterChannel(channel, true);
            string address = String.Format("ipc://{0}/UriHandler", IPC_CHANNEL_NAME);
            IUriHandler handler 
                = (IUriHandler)RemotingServices.Connect(typeof(IUriHandler), address);

            // need to test whether connection was established
            TextWriter.Null.WriteLine(handler.ToString());

            return handler;
        }
        catch {
            Console.WriteLine("Couldn't get remote UriHandler object.");
            Console.WriteLine();
        }

        return null;
    }

    public bool HandleUri(Uri uri) {
        // this is only a demonstration; a real implementation would:
        // - validate the URI
        // - perform a particular action depending on the URI

        Program.MainForm.AddUri(uri);
        return true;
    }
}

Entry point

The application entry point (usually the Main method in Program.cs) needs to be modified in order to enforce a single instance of the application and handle URIs supplied via the command-line. The logic is as follows:

  1. Call UriHandler.GetHandler() to connect to the service class.
  2. If a reference is returned and a URI was passed as a command-line argument, call HandleUri() on the remote reference.
  3. If a reference is returned but no arguments were passed, exit.
  4. If a reference is not returned, call UriHandler.Register() and display the main form. If, additionally, a URI was passed as a command-line argument, call HandleUri() on a local instance of UriHandler after the form has been shown.

Installer

The URI scheme must be configured in the registry prior to launching the application. Since this usually requires elevated privileges, this step is best performed during the installation of the application.

The code to register the URI scheme is as follows:

const string URI_SCHEME = "myscheme";
const string URI_KEY = "URL:MyScheme Protocol";
const string APP_PATH = @"C:\Code\SingleInstanceWithUriScheme\bin\Debug\Application.exe";

static void RegisterUriScheme() {
    using (RegistryKey hkcrClass = Registry.ClassesRoot.CreateSubKey(URI_SCHEME)) {
        hkcrClass.SetValue(null, URI_KEY);
        hkcrClass.SetValue("URL Protocol", String.Empty, RegistryValueKind.String);

        using (RegistryKey defaultIcon = hkcrClass.CreateSubKey("DefaultIcon")) {
            string iconValue = String.Format("\"{0}\",0", APP_PATH);
            defaultIcon.SetValue(null, iconValue);
        }

        using (RegistryKey shell = hkcrClass.CreateSubKey("shell")) {
            using (RegistryKey open = shell.CreateSubKey("open")) {
                using (RegistryKey command = open.CreateSubKey("command")) {
                    string cmdValue = String.Format("\"{0}\" \"%1\"", APP_PATH);
                    command.SetValue(null, cmdValue);
                }
            }
        }
    }
}

The APP_PATH constant above would be replaced with the actual installation path of the application.

Download

SingleInstanceWithUriScheme.zip (Visual Studio 2012 Solution, 82KB)

Usage

  1. Build the solution.
  2. Run the installer (Installer.exe) to register the URI scheme.
  3. Run the main application executable.
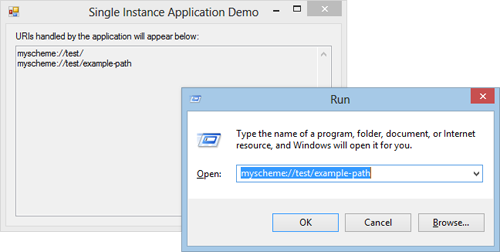
  4. Use the Windows run command to open a URI such as myscheme://test
  5. Observe the URI appearing in the application window.
  6. Repeat, with and without the application running.

Final words

This is just a basic example of how to create a single instance application and a custom URI scheme, but it can scale to meet the needs of non-trivial Windows Forms applications with similar requirements. If building upon this example, you may wish to consider setting the IPC channel name such that it is unique per user (as opposed to per machine) – this will allow the single instance behaviour to work in a multi-user environment.